Monday, May 01, 2006

Dont laugh part 2 (the tear down)


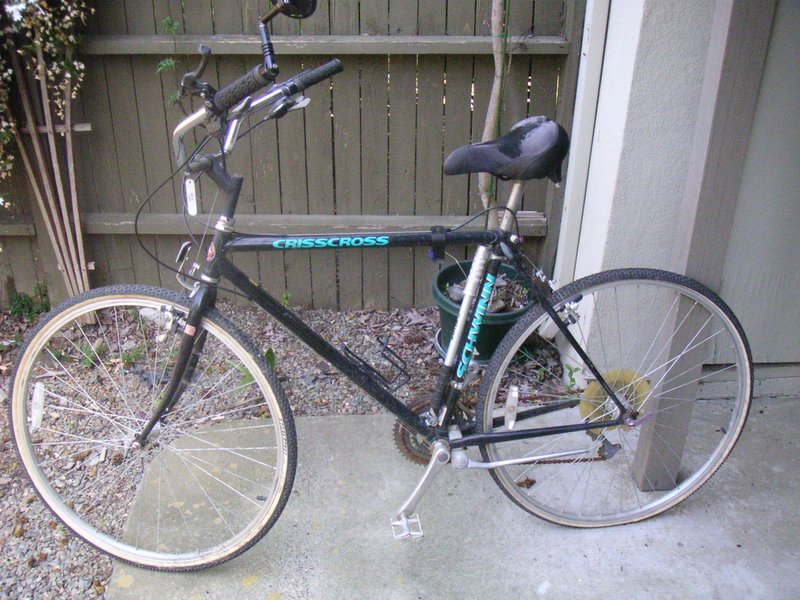
So, next was to tear the bike down. Taking off all the crap can be fun. Although, I recommend wearing latex gloves and opening a beverage of your choice. Wheels off first, then chain (which wouldnt fit into my Pedro's chain breaker, so I took two vice grips and twisted), then all the rest of the rusty dirty old parts. Its cool to greet bolt threads that havent seen the light of day since 1991.


Oh, and before I took anything off the bike, I weighed her.... 31.5 pounds.


When I went to get the cranks off, they werent happy with leaving their old friend and they stripped out my Park crank puller. That sucks. I'll take that to my LBS later. So everything is off the bike. I sorted the parts into what I might want to keep and what was definetly garbage. And this made it obvious what I still needed.


I realized that I had some parts that I could use for this build off of an 1979 Peugeot that I had already stripped some parts off of. Namely, the handlebars and brake levers.

Another matter to solve is gearing: I've narrowed down my drivetrain options to either run it 1x7 or singlespeed. The reason I say 1x7 is that it already has a 7 speed freewheel on the rear wheel, I could use the 7 speed rear derailleur that came with the bike as well, and all I would need to purchase was a 7 speed barcon shifter. I could also set it up as a singlespeed and still use the rear wheel (although it'd have to be redished) but I'd still need a freewheel "bmx" sprocket to screw onto it. And I like the option of having it geared better than mono-speed.

I threw on one of my cyclocross wheels and the clearance is great on the rear triangle.


Tomorrow comes the paint...

Sunday, April 30, 2006

The 1991 Schwinn Catalog


So I did some research yesterday and found that my Schwinn CrissCross had a serial number stamped onto the headbadge: 1471. Meaning it was made on the 147th day in 1991. With a little more research, I found a guy in the bikeforums.net forum that referenced in one of his posts that he had the 1991 Schwinn catalog.

So I pm'ed him and he was kind enough to send me two scans, one of the CrissCross' page and another of the spec list that usually appears at the back of the catalog.

With this information its kind of cool to see what is stock and what has been replaced. The handlebars are obviously someones idea of a good thing at some point, but most of the rest of all the components are original. Also this bike would be called a hybrid today, but based on the Schwinn literature it seems that they intended this bike to be a little more hardy than that and to be ridden on some singletrack, "it can handle ruts, rocks and screaming downhills."

Saturday, April 29, 2006

Dont laugh


So yeah, today was the bike auction. Got there at like 15 mins after the viewing time was started (8:15a) and began looking around. Most of the bikes were junk. Most of them were Walmart/Target Roadmasters and Motiv's etc. But there were a couple pretty cool rigs in the lot, well potentially cool bikes. I began writing down the lot numbers of bikes that I thought had potential.

In my last walkthrough, I saw this Schwinn CrissCross that I missed on the first and second go around. I was looking for bikes with drop bars, nothing like this for sure. Well, first I noticed the name "CrissCross". Then I took a closer look and noticed it had front and rear cantilever brakes--thats good. Then I checked to see what size tires it was running 700x35 front and back---thats good too. I checked the tire clearance and there looked to be plenty of that as well! I wrote down the lot number and "cross bike" next to it.

The two main things I was looking for was a bike that took 700c or 27" wheels and that had plenty of room for a 32mm tire. This bike had that, AND it had canti mounts already. Meaning no need for a new front fork, and no need to have my local framebuilder weld on some rear canti braze on. Bonus!

This bike's lot number was 61, which was good cause they had 418 bikes or so and didnt want to have to wait for 2.5-3 hours to bid on it. A lot of the Schwinn's were going for $50 ish and the beach cruisers were selling in the $80-$110 range. College kids like their beach cruisers.

When lot 61 came up, some people started bidding, it got up to $30 and stalled, then I bid. I got into a little bidding war with another buyer, and honestly, I didnt really know what was going on. All I know is that I bought it for $65 plus $4 tax.

In the next week, I'll be tearing this bike down, painting it, and making it into a raceable cyclocross bike.

I havent decided what I'm going to do with it when I'm done building it up. Although, I know im not going to keep it, as I have enough bikes for now as it is. One thought I had was to sell it on Ebay and donate the money to charity like LAF. Another was to give it away to the person that writes me the best story on why they need this cyclocross bike. What do you guys think I should do?

Thursday, April 27, 2006

Going to a bike auction..


So UC Davis (a local college and my alma mater) is having a bike auction this weekend. There they will be auctioning off about 350 used bikes that have been claimed by the University police. Wheres the cyclocross content you may be wondering?

My plan is to go get an old road bike and an old mountain bike and do a little project to show how either one of these could be turned into a cyclocross bike.

The finished bikes probably wont be light enough for the Plus One Lap Gallery, but they will be cheap (goal is under $100 each after the conversion).

I'll be taking my calipers to measure the max tire size in the rear chainstay on all the road bikes that look promising.

I'm excited to see what ill find...

Wednesday, April 26, 2006

The average gallery weight


So, there are currently 12 lightweight cyclocross bikes in the +1 lap gallery (making it the largest lightweight cyclocross gallery in the "known world" to quote American Idol's Randy Jackson). I took an average of those bikes and they come out to 16.48 lbs. I find this fairly impressive considering that it is about 5 pounds lighter than the typical stock cyclocross bike that rolls out of the local bike shop. To say the least, these bikes are ahead of the bell curve for bike weights on the line at the local cyclocross race.

It intrigues me that more manufacturer's havent embraced cyclocross weight weenie'ism the way its been embraced by the road or mountain bike sections of cycling. Hopefully, in the future, manufacturers will begin to outfit bikes that come stock at a weight that will earn them a spot in the Plus One Lap gallery (sub 18 lbs).

Until then, just wanted to say thanks for the submissions I've received thus far, there are a lot of cool bikes in the gallery, and hopefully more people will be sending in their bikes soon, as the cyclocross season rapidly approaches (maybe youre just like me and have your cyclocross bikes in pieces stuffed in your closet and laying on the floor in your back bedroom) If so, I'm willing to assume that the gallery submissions will skyrocket at about the end of September and early October of this year as the season will be then upon us.

Thursday, April 20, 2006

Plus One Lap Market is really open


So earlier this week, I announced that I was going to be selling KCNC items through the site. The parts arrived today and they are now for sale at
Plus One Lap Market. I am very excited about supplying these lightweight cycling components to my readers at a discounted rate. Go take a look at what I got.

Again, I ordered from the KCNC catalog what I thought would be most popular, if there is something from KCNC that you want that I do not currently have, send me an email and I will try to order that part the next time I place an order with them.

Wednesday, April 19, 2006

LightWeight Cyclocross Bike #12: Jon's Bianchi


Another bike to add to the world's largest lightweight cyclocross bike gallery, Jon's Bianchi Cross Concept! You've probably never seen Celeste Candy pedals before, so check it out...

His current weight is at 17.5 lbs (7.94 kg). Jon says hes, "hoping to shed more lbs for the coming season."


Frame: '03 Concept frame
Fork: Alpha Q
Cranks: FSA carbon compact cranks.
Wheels: Mavic Kysrium SL's with Tufo elite tubular clinchers
Brakes: Cane creek cantis with tektro carbon top mount levers
Brifters: Ultegra
Derailleurs: Ultegra
Handlebar: Salsa 'bell lap'
Stem: FSA OS 140
Seatpost: Easton EC70 carbon
Saddle: fizik Arione
Pedals: one of a kind 'celeste' colored crankbrothers candy sl's.

The story behind the celeste pedals (a non production color) is:
"I saw them (pedals) at Interbike a couple years ago
when 'candy's' first came out. They were part of the
display at the booth, I asked if they'd sell them to
me, but they insisted that they were NFS (not for sale)!

When I got home I contacted them again (Crankbrothers
sponsors our team, Missing Link / Bianchi), and they
sent them to me eventually. Sweet.

Jon says he plans on going single ring for the 2006 season. 44 or
42 tooth with a 12-25 cassette. Maybe also a outboard
bearing style crank and maybe a lighter seat (sella Italia SLR?).

Thanks for the photos Jon.

If you have a sub 18lb cyclocross bike email it to me at


Monday, April 17, 2006

KCNC components


I will be selling KCNC components through Plus One Lap within the next few days! My first order of parts should be arriving within three days from KCNC. In that order will be several things: KCNC's newest aluminum seatposts (27.2 and 31.6 both with titanium hardware) that weigh under 150 grams and cost less than $90. As well as titanium bottom brackets and KCNC's Silverbone crankset which is an ISIS style crankset that they claim is very light. Lastly some race day aluminum cassettes.

This is one of the reasons I havent posted on here in some time. It has been involved working out the details of this arrangement.

Hopefully more partnerships will be established in the future. My goal is to supply hard to find lightweight cyclocross gear at the lowest prices around.

Friday, April 07, 2006

Mountain Biking on a CX bike at Sea Otter


In the first mountain bike event of the Sea Otter Classic, there was a little cross content----Adam Craig on his cyclocross bike. The mens elite field contained some of the major players from last season's Elite men's cyclocross field: (Wells, Kabush, Wicks, Craig and Thomas Frishcknecht) But it was Craig on a cyclocross bike in this mountain event that makes the story cool.

Even more impressive would have been if he won on that cyclocross bike (24th place eventually) but another cyclocross star and current National Champ, Mr. Todd Wells, did pull out a 6th place 1.08 mins off the pace of winner Jean Christoph Peraud from France. I've never rode at Sea Otter, but what's interesting to me is that someone can be as competitive on a unsuspended CX bike as they can on a mountain bike. Not that this is something new, people have been riding cyclocross bikes on singletrack and in mountain bike races before, its just cool to see it being done.

more race content here.

Wednesday, April 05, 2006

Carbon Cantilevers redesigned v1.3


So, as mentioned previously, I've been playing around with other designs for my carbon cantilever brakes. The main goals are lighter weight, easier construction, and more clearance for springs. Assumed is that they are strong and dont break. I thought I'd post what I'm thinking the next version will be...

My orginal carbon cantilevers (which I'm now calling v1.2) were made in a "male mold" Meaning that the carbon was laid over an object. A female mold is where the carbon is placed within that object. One of the key differences between these two mold styles is that when something is made from a female mold, the outside of the finished object comes out very clean and professional looking. Because my current brakes were made in a male mold, the outside of the brakes are kinda bumpy/rough and the insides of the arms are very smooth. I want this to be in reverse.

My v1.3 brakes will be made from a female mold. With the design featured above, the mold will be even simpler...ie the inside corner of a sturdy box.

Also, because they will only have one arm, even though I will use at least one extra layer of carbon and with the reinforcement piece, the weight "should" be lower. Also, it will have a cut out as seen in the pictures, this is where the spring will attach to the brake, and will lighten up some as well.

Lastly, the arms will allow a lot of room for spring clearance. As I mentioned before, I made two springs a 2 twist and a 3 twist. The brakes dont allow enough room for the 3 twist, and I'm not sure if the 2 twist really give me all the spring tension I want (although its not bad). With this extra room on the backside of the brake, I will be able to easily have a 3 twist spring.

I havent yet inputed this drawing into CAD yet, that is soon to come...

Heres a look at the backside of the object, I dont think it was obvious the general shape of the arm from the one angle.


For more angles of the brake arm (just click on the pic, it didnt minimize very well:


Monday, April 03, 2006

Make picked up my carbon brakes how to...


Very exciting for me is that Make (makezine.com) picked up my post on how I made my carbon cantilever brakes here. Welcome Make readers!

Pic above is my desk with the latest Make mag laying next to some drawings I've done of version #2 of the Carbon Cantilevers I'll be making soon.

How I made my carbon brakes

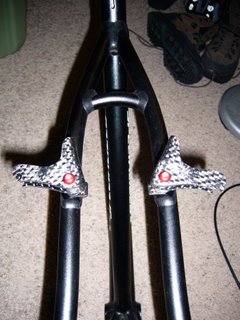
carbon cantilever brakes

I thought I'd go into greater detail on how I made these carbon
cantilever brakes. First off, it started with looking at the design
for the Empella Frogglegg brakes as well as the Paul's Neo Retros. I knew I wanted them to use V brake style pads (as opposed to the smooth post style pads that are used on the Empella brakes). The primary reason I wanted to go with V style brakes was so that I could toe in the brake pads for better adjustability as well as I thought making arms to accept the V style pads would be easier to make. My first try at making a cantilever arm came out really bad. I simply

laid carbon over a thin plywood board (8mm in width). Unfortunately, the width of the board wasnt enough space to fit a V brake pad nut into. I realized, that the area where the brake pad mounts to the arm had to be wide enough to accept a V brake pad nut (13mm) but the brake itself down where it slides onto the stud needed to be narrower (8mm) in order for the empella straddle nut to slide in place.

Back to the drawing board....
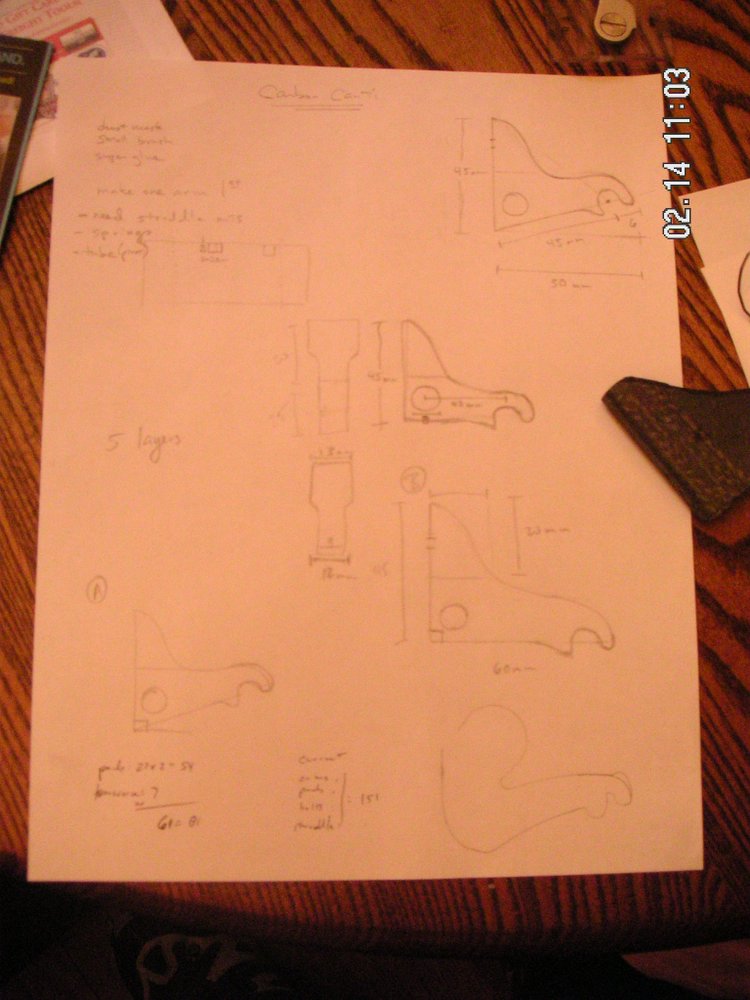
design of cyclocross brakes
and I decided that I would take that same original board (8mm wide), and add a plastic spacer on the top to each side (2.5mm each). This would create an internal width that was what I wanted, but the end of the arm would be the correct width for the straddle nut to side into. (since this point, I think I may have come up with an even cooler design, but I am still in the drawing phase).

The carbon fiber that I used is 6 K 10.9 oz/sq yd and I used 5 plies of it. After the carbon is laid down over the "mold", I laid some nylon release peel ply over it so that the absorbant batting like material called "breether and bleeder" wont stick to the carbon project itself. This batting material is there to absorb any excess resin that gets pressed out of the carbon fiber (and there will be a good amount). All of this is placed inside of a vaccuum pump that has a hose coming out of it, and inserted into a gallon freezer Ziploc bag. Composite supply stores sell the attachment that connects the hose to a bag (its called a vacuum connector). Using a ziploc was a risk (as they sell "special" bags for laying up carbon) but this actually worked perfectly, and it was much cheaper.

Then, the vaccuum pump gets turned on and its like a seal a meal
system (which i've thought might actually work if you didnt want to
purchase a vaccuum pump----although I got mine at a yard sale for
about $10) and it sucks out all the air and also sucks the excess
carbon into that batting material mentioned above.
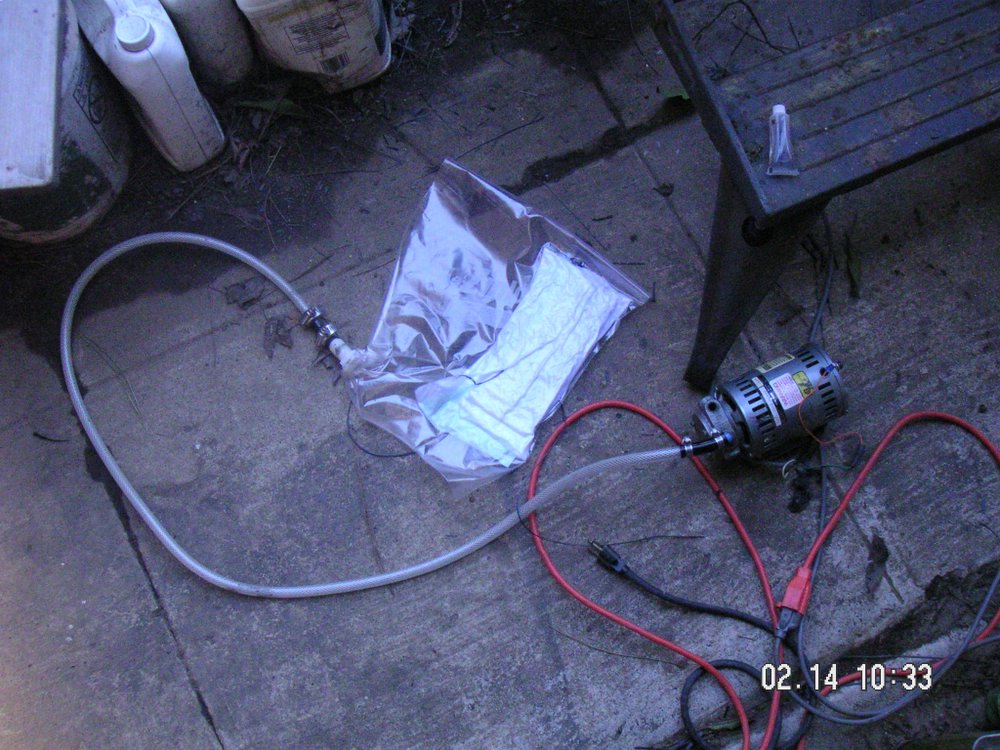
Temperature is
crucial as resin doesnt like to harden in cold temps----70 degrees F is about right. After the carbon/resin/mold are in the vaccuum bag for a couple of hours, they are removed, and the batting and release film are removed to let the carbon/resin to breathe. You'll want to remove them from the vaccuum bag only after the resin has set and is mostly dry (otherwise the carbon will lose its shape). However, I've found that once its sufficiently set, removing it from the vaccuum bag lets it breathe and dry even quicker.

This is allowed to set for a 24 hours, until its fully cured. When it no longer smells like resin, its fully cured. Removing it from the mold invloves a putty knife. Then, I got out the Dremel, and began carving out the brake arm as I had already drawn out on a sheet of paper. This is one of the most difficult and time consuming parts othis project as you'll want it to look good and you'll want each side of the arm to match each other.

After this is done, you'll need to drill out a hole for the brake stud to slip over. Next, I bought a rod of brass tubing thats 11/32" (it should fit just perfectly over the cantilever brake stud). This tube was then epoxied into place, then a layer of UV resistant clear coat was sprayed over it. Repeat this process to make the other arm and you're done. Well done with the brake arms. I also made the springs out of titanium and tuned down the brake pads to lighten them up. I will post a more in depth look at how to make your own spring soon.
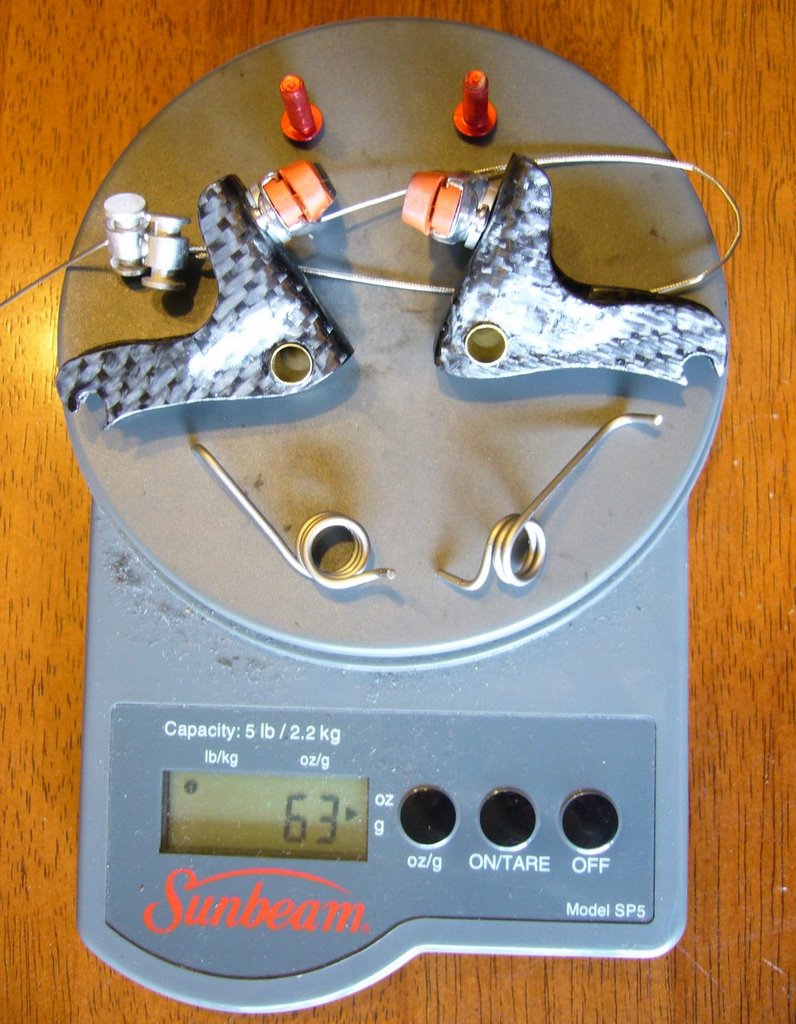


Tools I used for this project:
Dremel with accessories
Drill press
Metric calipers
Vacuum pump
putty knife
and composite supplies as mentioned in post

Sunday, April 02, 2006

My Excel build 15.00 pounds planned


So, in a comment left by a reader of Plus One Lap, it was asked if I could post my build sheet of my planned bike. Currently, the build is scheduled for 15.00 pounds. Although, I'm still trying to source some of the parts (carbon fork primarily). The excel spreadsheet lists the Kuota Mud, but now im leaning toward the 4ZA Python. I've got the Powercordz for the rear derailleur, but still
need the Powercordz for the brakes. Also, I still need to make a couple of the small carbon things like the top cap and bar end plugs. Lastly, when the bike is built Paul Neo Retro's will be going on the front, until I assess what changes I will make to the second set of carbon cantilevers that I'll be making.

Anyway, the build list is here.

Monday, March 27, 2006

Tuning Brake Pads

Tuned koolstop brake pads
So for my lightweight carbon brakes, one way I got the weight extra low was to tune the brake pads. This was fairly simple to do, and I was able to shed a good amount of weight doing so, lets check it out...

[Edit: perform this tuning at your own risk. This is a story of what I have done, but I am an idiot for grams. Drilling, dremeling and tuning in general is dangerous, proceed with caution.]

So first off, I used road pads. Yes this isnt a road bike, so why the road pads? Well, for starters they're lighter than any mountain bike style brake pad out there. And secondly, its nearly impossible to find mtb style pads that work with carbon rims (not that I currently own any carbon rims--boo!) Lastly, I didnt invent this, if you went to the MTB section on Weight Weenies, or www.mtbr.com (save some weight section) all the WW mountain bike guys have done this already, I'm just applying some mtb theory to our great sport.

So, I went to my local bike shop and bought the Kool Stop pads. The Dura Ace pads would have worked too, as well as the Jagwire's. Basically, you want a brake pad that has that conical washer on it. V brakes style pads all have this, but not all road pads do. Having this conical washer will allow you to toe in the brakes to some degree. Not only is it the addition of a conical washer, but the back of the pad is rounded to match the conical washer.

Next, I drilled out three holes in the back of the pad. I dont know how much weight this removed, but at least some grams. I also ground off the little wing thing, on the bottom of each pad. I dont know what this is for, and I dont care. It seems like a stupid part to me, and its dead weight--gone.

Now its time to rethink how this pad mounts to the brake. I flipped it around from stock. On the stock setup, there is a steel T bolt coming out of the pad, then one steel washer, then one steel allen nut. The word "steel" is like music to a tuning- gram- freak's ears. Steel is so easy to replace with lighter options (ti, aluminum, plastic)

What I did next was bought an M5 aluminum button head bolt (although I would probably use ti for the front brake--this is a rear brake) and an M5 aluminum nut. I had to grind down the nut so that it would fit inside of the pad carrier. Also, I bought a nylon washer from my hardware store to replace the steel one. I needed to grind down the nut in the right way so that it wouldnt turn within the carrier but also that Iit would just fit. You'd understand if you saw it.

I was able to take the pair of pads that came in at around 50 grams, and get them down to 24 grams for the pair. The only cost to do this was about 30 mins of time and $5 for the bolts/nuts. So a pretty good deal in my eyes.

Friday, March 24, 2006

More homemade projects


So, recently ive been working on a few projects. These include gutting out a Dura Ace STI lever and making my own carbon saddle.

But until I get those projects done and up on Plus One Lap, I'm going to link to some other sites who have completed some pretty cool homemade projects.

Timbo's got some pretty cool stuff he's made from carbon including a saddle/seatpost combo, a bottle cage and a carbon flightdeck case. The only critique I have about his mods are it doesnt sound like he can actually use them. Functionality would increase the cool factor. Timbo's site.


Samu's Kitchen: Samu has some very cool projects that he's working on including a carbon time trial bike. Other projects have included saddle/seatpost combo and a standard seatpost. Samu's Kitchen