Showing posts with label DIY Carbon Cantis. Show all posts

Monday, April 03, 2006

How I made my carbon brakes

carbon cantilever brakes

I thought I'd go into greater detail on how I made these carbon
cantilever brakes. First off, it started with looking at the design
for the Empella Frogglegg brakes as well as the Paul's Neo Retros. I knew I wanted them to use V brake style pads (as opposed to the smooth post style pads that are used on the Empella brakes). The primary reason I wanted to go with V style brakes was so that I could toe in the brake pads for better adjustability as well as I thought making arms to accept the V style pads would be easier to make. My first try at making a cantilever arm came out really bad. I simply

laid carbon over a thin plywood board (8mm in width). Unfortunately, the width of the board wasnt enough space to fit a V brake pad nut into. I realized, that the area where the brake pad mounts to the arm had to be wide enough to accept a V brake pad nut (13mm) but the brake itself down where it slides onto the stud needed to be narrower (8mm) in order for the empella straddle nut to slide in place.

Back to the drawing board....
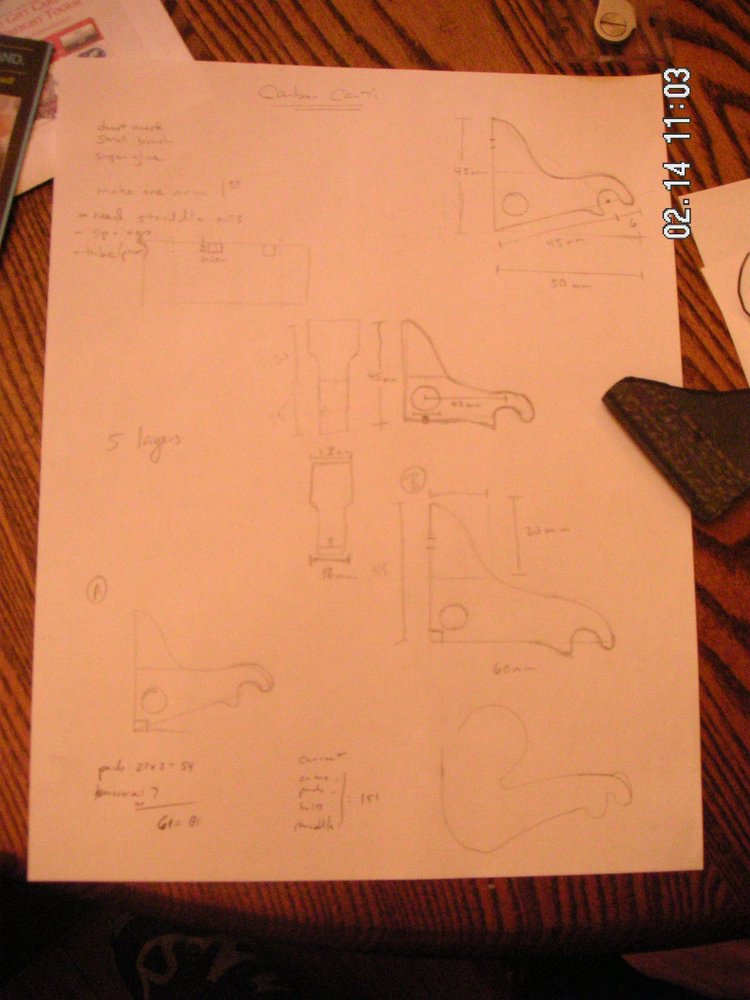
design of cyclocross brakes
and I decided that I would take that same original board (8mm wide), and add a plastic spacer on the top to each side (2.5mm each). This would create an internal width that was what I wanted, but the end of the arm would be the correct width for the straddle nut to side into. (since this point, I think I may have come up with an even cooler design, but I am still in the drawing phase).

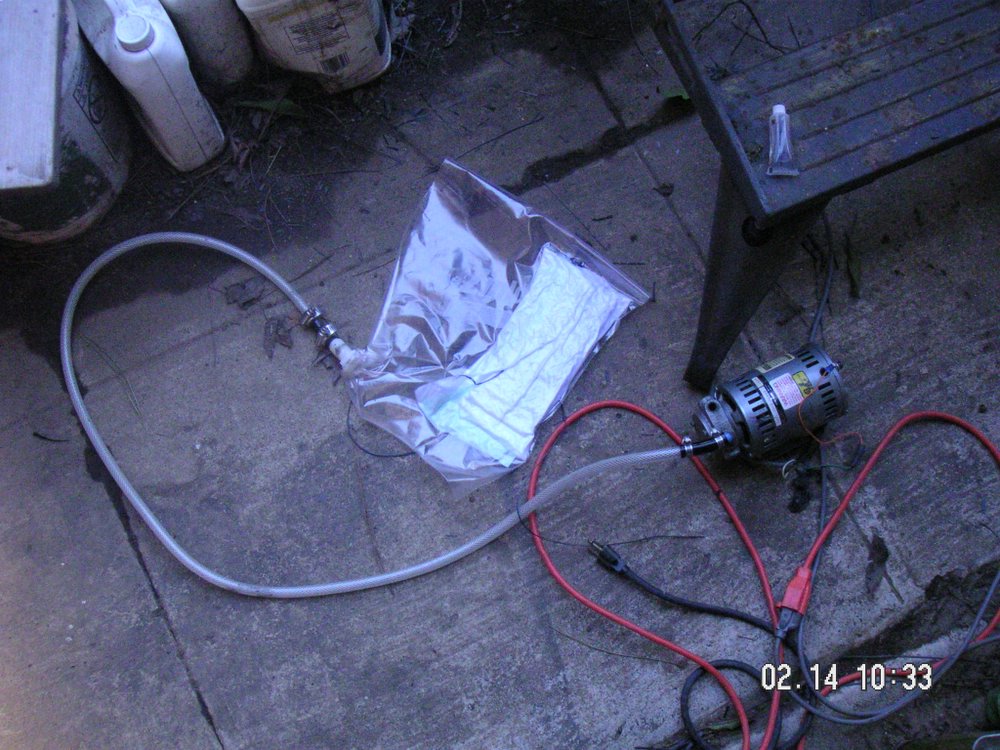
The carbon fiber that I used is 6 K 10.9 oz/sq yd and I used 5 plies of it. After the carbon is laid down over the "mold", I laid some nylon release peel ply over it so that the absorbant batting like material called "breether and bleeder" wont stick to the carbon project itself. This batting material is there to absorb any excess resin that gets pressed out of the carbon fiber (and there will be a good amount). All of this is placed inside of a vaccuum pump that has a hose coming out of it, and inserted into a gallon freezer Ziploc bag. Composite supply stores sell the attachment that connects the hose to a bag (its called a vacuum connector). Using a ziploc was a risk (as they sell "special" bags for laying up carbon) but this actually worked perfectly, and it was much cheaper.

Then, the vaccuum pump gets turned on and its like a seal a meal
system (which i've thought might actually work if you didnt want to
purchase a vaccuum pump----although I got mine at a yard sale for
about $10) and it sucks out all the air and also sucks the excess
carbon into that batting material mentioned above.
Temperature is
crucial as resin doesnt like to harden in cold temps----70 degrees F is about right. After the carbon/resin/mold are in the vaccuum bag for a couple of hours, they are removed, and the batting and release film are removed to let the carbon/resin to breathe. You'll want to remove them from the vaccuum bag only after the resin has set and is mostly dry (otherwise the carbon will lose its shape). However, I've found that once its sufficiently set, removing it from the vaccuum bag lets it breathe and dry even quicker.

This is allowed to set for a 24 hours, until its fully cured. When it no longer smells like resin, its fully cured. Removing it from the mold invloves a putty knife. Then, I got out the Dremel, and began carving out the brake arm as I had already drawn out on a sheet of paper. This is one of the most difficult and time consuming parts othis project as you'll want it to look good and you'll want each side of the arm to match each other.

After this is done, you'll need to drill out a hole for the brake stud to slip over. Next, I bought a rod of brass tubing thats 11/32" (it should fit just perfectly over the cantilever brake stud). This tube was then epoxied into place, then a layer of UV resistant clear coat was sprayed over it. Repeat this process to make the other arm and you're done. Well done with the brake arms. I also made the springs out of titanium and tuned down the brake pads to lighten them up. I will post a more in depth look at how to make your own spring soon.


Tools I used for this project:
Dremel with accessories
Drill press
Metric calipers
Vacuum pump
putty knife
and composite supplies as mentioned in post

Friday, March 10, 2006

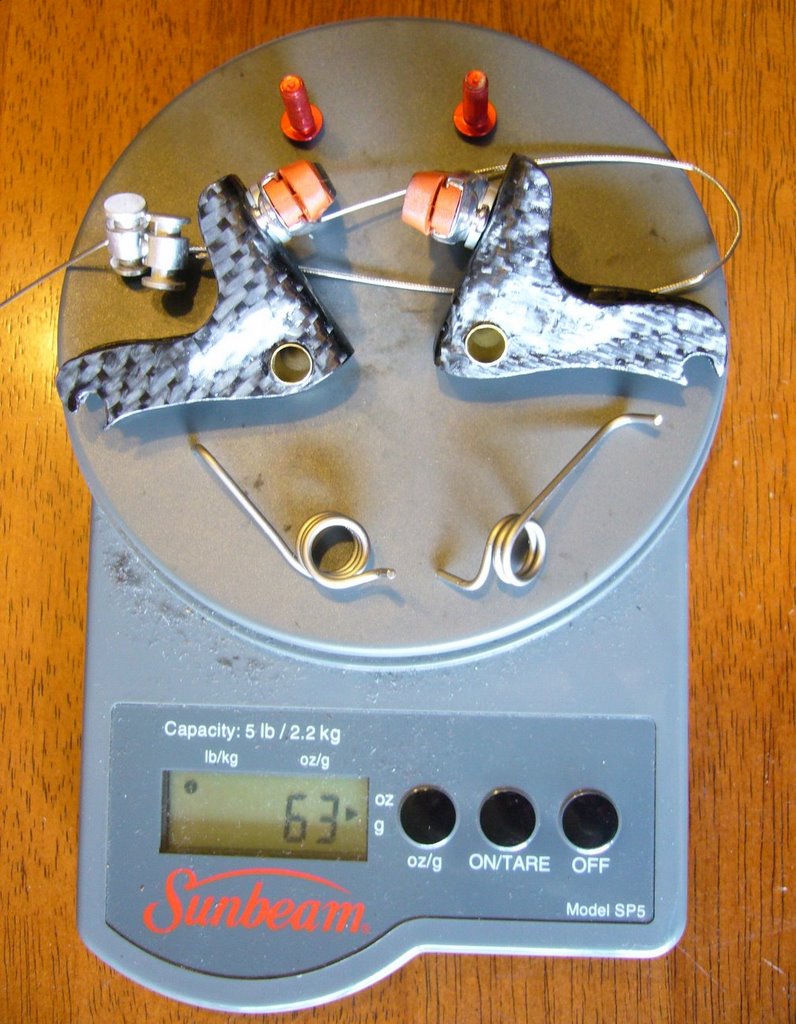
My Carbon brakes are done! 63 grams a pair!


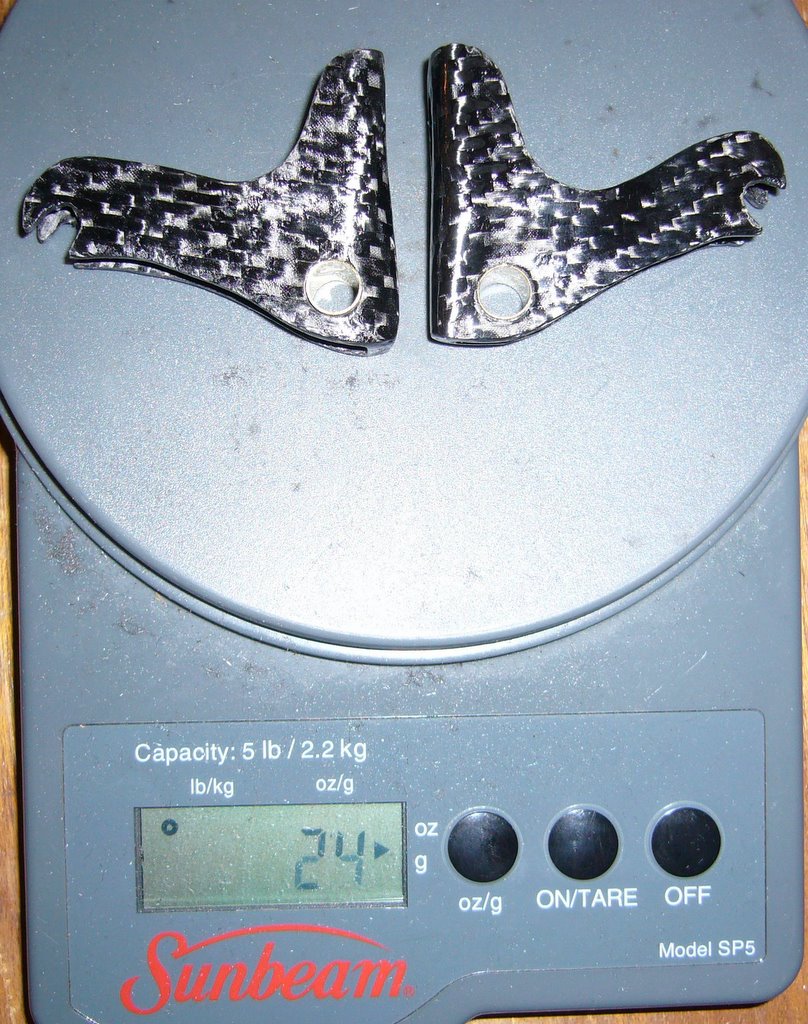
So, I think I did it. The lightest cantilever brakes ever? Well these came in at 63 grams for the pair, with all hardware. In the end, this pair of Custom Carbon Cantilevers (3C) came out looking pretty good I think. And for the weight of 63 grams, it is lighter than any cantilever I have ever seen before. One way I was able to get them so light was to tune the brake pads. As you might have noticed, I used road brake pads. I dont see why one wouldnt use road brake pads. If you look at any of the top 10 bikes on www.lightbikes.com, you'll see that they are all using tuned road pads. Also, a number of mountain bike riders on Weight Weenies are using road pads on their mtb bikes. And I did tune these pads too. Aluminum carrier bolt, I fabricated a small aluminum nut to place on the inside of the carrier and some nylon washers later and the weight for the pair of my pads came in at about 23 grams. Compare this to a pair of kool stop v brake pads which weigh 56 grams (just for the pads) And my brakes are as if there is nothing there. Also, the titanium springs lightened the load a little more. Although, most of the weight savings came from the carbon arms themselves, which combined weigh less than 1 Paul NeoRetro brake arm. Lets just hope they stop me as well. I am going to put these on my rear wheel to test at first, and if they hold up will make another pair for the front. For the front wheel, I'll probably go with a titanium carrier bolt instead of aluminum. Ride report still to come...

Monday, February 27, 2006

Homemade Ti cantilever return springs


So, the second part of my Carbon Cantilever project is to make the titanium cantilever return springs. I know that this wont drop much weight as the standard steel springs weigh in at about 9 grams a pair. But, I want these brakes to be as light as possible without giving up functionality. Also, because my carbon arms are a different dimension than anything else out there, I was going to have make some custom springs anyway, why not make them out of titanium?

I didnt invent titanium springs or how to make them. I found a post on weight weenies that showed how to make a ti spring out of a titanium spoke for use on a front derailleur (see link below). After seeing this, I thought I could do the same thing for my carbon brakes. I ordered some titanium springs in 2.0 width and received them yesterday. This morning I went to work.

Items you'll need for this project are: a benchmounted vise, 1 needle nose Vice Grips, 1 standard Vice Grips, a titanium spoke, a wire coat hanger, some wire cutters and a 3/8" bolt to wrap around.

I used a 3/8" bolt and it seems to have worked well. I made my first set a little too short (as I matched the empella froggleggs spring identically--or pretty close and my brakes dont have the same dimensions as the Empella's). So I made another pair.

The coat hanger is used to hold one end of the titanoium spoke. Also, I'd recommend practicing making these with a length of coat hanger as coat hangers are generally free and titanium spokes generally are not--and youre probably going to screw the first one up a little, I did.

You'll need to make two coathanger eyelets that hold the titanium spoke. One that wraps one direction and another than wraps the other direction. Due to the left and rind sidedness of the springs.

I decided to wrap the titanium around the bolt differently for each side to determine which spring tension was best. One was wrapped 3x around the bolt (like the empella's) and the other is 2x around. I'll test to see which one I like better.


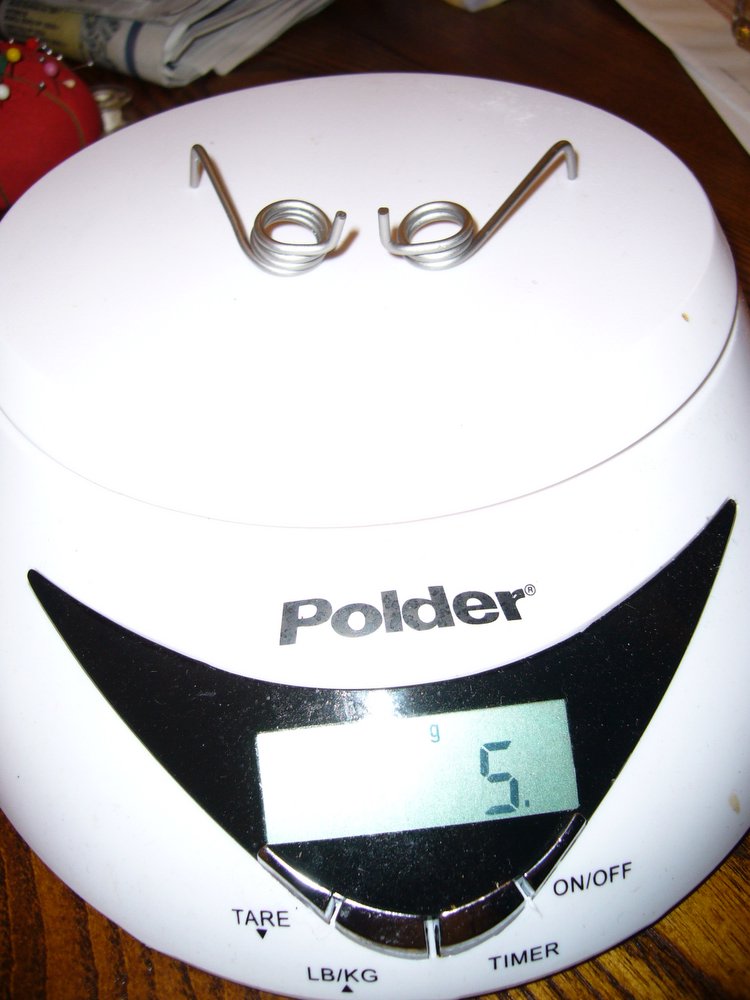
Total weight came in at 5 grams for the pair compared to the 9 grams for the standard springs. While, this only saved 4 grams, part of the reason is that my springs are larger to accomodate the shape of my carbon arms.


The Weight Weenie thread that shows how to make a ti spring for a front der.

Friday, February 24, 2006

Carbon Cantilever Brake Arms are finished


So, the first set of carbon cantilever brake arms have been completed. The arms themselves dont look like they rolled out the latest high tech factory----and thats probably because they havent. They look pretty good though I think. I finished the second arm yesterday, then sprayed them both with a clear coat (which added 3 grams). Still left is to epoxy the brass sleeves in place, and make the titanium springs. Also, I'm tuning the brake pads as well with some aluminum bolts, which I have yet to order.

Brass might seem a heavy item to put on these brakes, but each sleeve weighed about 1 gram, and they fit perfectly, and they were a lot easier than trying to fabricate a carbon sleeve to put in there. Also, brass is pretty weatherproof, so thats good.
I have some ideas on version 2, on how to make these look a little better, primarily I'd like to try a female mold instead of a male mold.

If I hadnt posted that I was even attempting this project, I'm not sure I would have ever got this far, so thanks to all you of whom come to this site.

Sunday, February 19, 2006

Carbon cantilever update #3

So, I again had problems with the carbon fiber cantilever brake project. I pulled the carbon out of the mold (material I put in there on Friday)
today in order to shape the other arm and it was just soft and flexy and crap. So I threw that away, and decided to try again. This time I went back to the old resin I was accustomed to, brought it into the back porch, with a heat lamp in the room and in the vacuum bag. I also brought a thermometer into the room so that I would know what temperature it was at. About 75 F is perfect, and I had the room at 78 F so thats close enough. I just pulled the carbon out of the mold, and its hard. So thats good. I'll be able to shape this whenever I get a chance to.

Yeah, so this is a lot of work. And it would be easier to buy the Spooky Carbon Canti's. However, this is relatively cheap (other than my time), and my pair should weigh in significantly lighter than the Spooky pair (around 30 grams saved per pair). Check back for updates.

I'm going to me fabricating my own titanium springs, and at this point it looks like I'll be making the small aluminum nuts for the end of the arms.

Friday, February 17, 2006

An update on my project....

Well, unless you have bad eyesight or didnt see my last post, I'm working on making carbon cantilever brakes. I got one arm nearly finished (all thats left is to spray it with a clear coat). I wanted to have them done by today and to have some pics for the website, but I ran into some problems...

...My first mold that I made was all wrong. And I didnt realize that until I took the carbon out of the mold. And started looking at it (you can see the inferior prototype in the main picture of my drawings--its sitting off to the side of the picture).

I went back to the "drawing board" and produced the designs that are pictured in the first post of this little "series". Those drawings resulted in a second mold, in which I was trying to create both arms at the same time, saving time and money. But, that didnt work out so well and I had to sacrifice a good deal of material just to get one arm out of the mess (when I pulled the carbon off of the mold, it pretty much destroyed the mold itself).

So I had to make another mold (#3), and I layed up some carbon yesterday to make the other arm. Unfortunately, its 50 F here in Sacramento and I didnt add enough catalyst to get the resin to harden. I tried everything too (heat lamps, kept it in the vacuum bag all day (like 9 hours)) and by night, I had to throw the wet carbon in the trash.

Today, its the same temperature outside, but I added about 5 times the amount of suggested catalyst, brought it into the garage, with a heatlamp on it again, and this time I think its going to work. I've taken it out of the vacuum bag and into the house where I think its going to dry and cure just fine. Basically, you cant take it out of the vacuum until the resin sets enough to hold the shape of the mold.

Another tricky point of the process was finding a tube that would slip over the brake post for the cantilever to pivot on. This had to be just the right size or else there would be major play in the brakes. I tried a lot of things, plastic spacers, premade fiberglass/carbon tubes, brass bullet casings, and even considered making my own carbon tube. Before I found a brass tube at my local Ace hardware store that had the perfect internal diameter.

I am going to also be making the end nuts I believe. I could buy the Empella nuts, they are $20 for a complete bike (not a bad price) but they are sold out at the present time, we'll see. The brake arm made currently weighs 12 grams without brake pads.

Tuesday, February 14, 2006

A hint at something I'm working on right now...


Thought I'd post a little teaser at what I'm doing right now.

We'll see if my little project works.